var _      = require('underscore')
var mixco  = require('mixco')
var c      = mixco.control
var b      = mixco.behaviour
var v = mixco.value-
script.twitch
-
This file is part of the Mixco framework.
- View me on a static web
- View me on GitHub
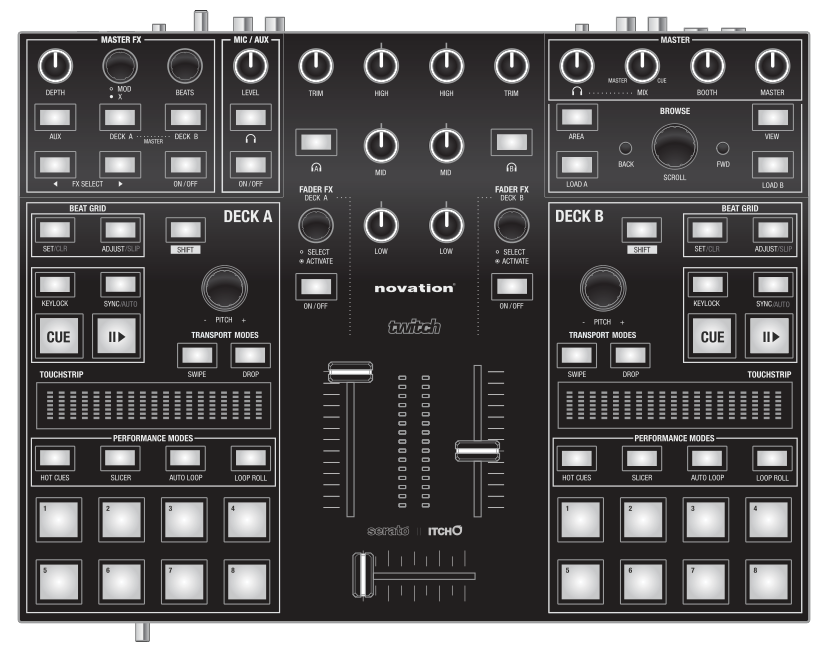
Mixx script file for the Novation Twitch controller.
This script serves as tutorial for creating scripts using the Mixco framework, but programming directly in JavaScript. Still, we recommend you to try CoffeeScript, since it is a bit of a nicer language.
If you want to modify this script, you may want to read the Novation Twitch Programmer Guide
Note for Linux Users
The Linux Kernel version 3.10 is required to get Novation Twitch detected as soundcard or MIDI device.
Dependencies
-
First, we have to import the modules from the framework. We use that the NodeJS
requirefunction. Note that all other NodeJS modules are usable too when writing your script with the Mixco framework. -
The script
-
When writing a controller script we use the
script.registerfunction to generate and install a script instance in the current module. The first parameter is the current module as defined by NodeJS, the second parameter is the JavaScript object with all the functions and information about our script.mixco.script.register(module, { -
Metadata
Then the
infoobject contains the meta-data that is displayed to the user in the MIDI mapping chooser of Mixxx.info: { name: "[mixco] Novation Twitch", author: "Juan Pedro Bolivar Puente <raskolnikov@gnu.org>", forums: 'https://github.com/arximboldi/mixco/issues', wiki: 'https://sinusoid.es/mixco/script/korg_nanokontrol2.mixco.html', description: "Controller mapping for Novation Twitch (in basic mode).", }, -
Constructor
The constructor contains the definition of the MIDI mapping. Here we create all the different control objects and add them to the script instance.
constructor: function () { -
Master section
Many of the master controls of the that the headphone volume, headphone mix, booth volume and master volume knobs are handled directly by the integrated soundcard of the controller. We map the rest here.
- Crossfader slider.
c.input(0x08, 0x07).does("[Master]", "crossfader") -
Mic/aux and effects
Sadly, the buttons Aux, Deck A, Deck B and PFL of the effects and microphone sections are controlled by the hardware in a bit of a useless way, so they do nothing – other than light up when they are pressed.
var ccIdFxBanks = function (index) { banks = 5 params = 4 ids = [] for (var j = 0; j < banks; ++j) ids.push.apply(ids, c.ccIds(index + params * j, 0xB)) return ids } -
- Microphone volume control and on/off button.
c.input(ccIdFxBanks(0x3)).does(b.soft("[Microphone]", "pregain")) c.control(c.noteIds(0x23, 0xB)).does("[Microphone]", "talkover") -
- The the Depth and Mix knobs in the Master FX section are mapped to mix and super of the first effect unit.
c.input(ccIdFxBanks(0x0)) .does("[EffectRack1_EffectUnit1]", "mix") c.input(ccIdFxBanks(0x1)) .option(scaledDiff(1/2)) .does("[EffectRack1_EffectUnit1]", "super1") -
- The beats knob can be used to change the selected effect.
c.input(ccIdFxBanks(0x2)) .does("[EffectRack1_EffectUnit1]", "chain_selector") -
- The on/off button of the FX section completley toggles the first effect unit.
c.control(c.noteIds(0x22, 0xB)) .does("[EffectRack1_EffectUnit1]", "enabled") -
c.input(c.noteIds(0x54, 0x7)).does( "[Playlist]", "SelectPrevPlaylist") c.input(c.noteIds(0x56, 0x7)).does( "[Playlist]", "SelectNextPlaylist") -
- The scroll encoder scrolls the current view. When pressed it moves faster.
scrollFaster = b.modifier() c.input(c.noteIds(0x55, 0x7)).does(scrollFaster) c.input(0x55, 0x7) .when (scrollFaster, b.map("[Playlist]", "SelectTrackKnob") .option(scaledSelectKnob(8))) .else_(b.map("[Playlist]", "SelectTrackKnob") .options.selectknob) -
- The area toggles the maximized library.
c.control(c.noteIds(0x50, 0x7)).does( "[Master]", "maximize_library") -
- The view button in the browser section lets you tap the tempo for the track that is currently on PFL.
this.viewButton = c.control(c.noteIds(0x51, 0x7)) -
Per deck controls
We use a
behaviou.chooserfor the PFL selection. This will make sure that only one deck’s PFL is selected at a time for greater convenience. Then, we define aaddDeckfunction that will add the actual controls for each of the decks.this.decks = b.chooser() this.addDeck(0) this.addDeck(1) }, addDeck: function (i) { var g = "[Channel" + (i+1) + "]" var ccId = function (cc) { return c.ccIds(cc, 0x07+i) } var ccIdShift = function (cc) { return c.ccIds(cc, 0x09+i) } var ccIdAll = function (cc) { return _.union(ccId(cc), ccIdShift(cc)) } var noteId = function (note) { return c.noteIds(note, 0x07+i) } var noteIdShift = function (note) { return c.noteIds(note, 0x09+i) } var noteIdAll = function (cc) { return _.union(noteId(cc), noteIdShift(cc)) } -
c.control(noteIdAll(0x0A)).does(this.decks.add(g, "pfl")) this.viewButton.when(this.decks.activator(i), g, "bpm_tap", g, "beat_active") -
- Volume fader and low, mid, high and trim knobs. Trim is the deck gain knob in Mixxx.
c.input(ccIdAll(0x07)).does(g, "volume") c.input(ccIdAll(0x46)).does(g, "filterLow") c.input(ccIdAll(0x47)).does(g, "filterMid") c.input(ccIdAll(0x48)).does(g, "filterHigh") c.input(ccIdAll(0x09)).does(g, "pregain") -
- Volume meters for each channel.
c.output(noteIdAll(0x5f)).does(b.mapOut(g, "VuMeter").meter()) -
- The fader FX we use to control the quick filter. The on/off button below can be used to toggle it. Likewise, pressing the knob momentarily toggles it.
c.input(ccIdAll(0x06)) .option(scaledDiff(1/2)) .does("[QuickEffectRack1_"+g+"]", 'super1') c.control(noteIdAll(0x06)) .does("[QuickEffectRack1_"+g+"]", 'enabled') c.control(noteIdAll(0x0D)) .does("[QuickEffectRack1_"+g+"]", 'enabled') -
Effects
- In the Master FX section, the FX Select left and right enable the first effect unit on the deck in the direction of the arrow.
c.control(c.noteIds(0x20+i, 0xB)) .does("[EffectRack1_EffectUnit1]", "group_"+g+"_enable") -
c.control(c.noteIds(0x52+i, 0x7)).does(g, "LoadSelectedTrack") -
Deck transport
- The play and cue buttons work as expected. On shift, the cue button does a reverse effect.
var redLed = 0x00 var amberLed = 0x40 var greenLed = 0x70 var pad = function (ids, color) { return c.control(ids).states({ on: color + 0xf, off: color + 0x1 }) } pad(noteIdAll(0x17), greenLed).does(g, "play") pad(noteId(0x16), redLed).does(g, "cue_default", g, "cue_indicator") pad(noteIdShift(0x16), amberLed).does(g, "reverse") -
- The keylock button toggles the pitch-independent time stretching. On shift, it toggles slip mode, in which loops and scratching continue playback on the background thus returning the playhead to where the track would have been.
slipMode = b.switch_() c.control(noteId(0x12)).does(g, "keylock") c.control(noteIdShift(0x12)).does(slipMode) -
- The sync button. Like the button in the UI, it can be held pressed to enable the deck in the master sync group.
c.control(noteIdAll(0x13)).does(g, "sync_enabled") -
c.control(noteIdAll(0x11)).does(g, "beats_translate_curpos") -
- The set button toggles loop and hot-cue quantization on or off.
c.control(noteIdAll(0x10)).does(g, "quantize") -
Pitch and transport bar
- The pitch encoder moves the pitch slider up and down. When it is pressed, it moves it pitch faster.
var coarseRateFactor = 1/10 var coarseRateOn = b.modifier() c.input(noteIdAll(0x03)).does(coarseRateOn) c.input(ccIdAll(0x03)) .when (coarseRateOn, b.map(g, "rate").option(scaledDiff(2))) .else_(b.map(g, "rate").option(scaledDiff(1/12))) -
- In drop mode, the touch strip scrolls through the song.
c.input(ccId(0x34)).does(g, "playposition") -
- In swipe mode, the touch strip nudges the pitch up and down. When shift is held it simulates scratching.
c.input(ccId(0x35)).does(g, "jog") .option(scaledSelectKnob(-1/3)) c.input(ccIdShift(0x35)).does(b.scratchTick(i+1)) .options.selectknob, c.input(noteIdShift(0x47)) .does(b.scratchEnable(i+1, 128)) .when(slipMode, b.map(g, "slip_enabled").options.switch_) -
Performance modes
Hot cues
- In hot-cues mode, the performance buttons control the hot cues. One may clear hot-cues with shift.
for (var j = 0; j < 8; ++j) { pad(noteId(0x60+j), amberLed).does( g, "hotcue_" + (j+1) + "_activate", g, "hotcue_" + (j+1) + "_enabled") pad(noteIdShift(0x60+j), amberLed).does( g, "hotcue_" + (j+1) + "_clear", g, "hotcue_" + (j+1) + "_enabled") } -
Slicer
There is no functionality like a slicer in Mixxx, but we reuse these pads for various purposes in this mode.
- The buttons 1 to 4 trigger the first four samplers. The sample plays as long as the button is held.
for (var j = 0; j < 4; ++j) pad(noteIdAll(0x68+j), redLed).does( "[Sampler" + (j+1) + "]", "cue_preview") -
- The buttons 5 and 6 trigger a spinback and brake effect respectively.
pad(noteIdAll(0x6C), greenLed).does(b.spinback(i+1)) pad(noteIdAll(0x6D), greenLed).does(b.brake(i+1)) -
- The buttons 7 and 8 perform a stutter effect at different speeds.
pad(noteIdAll(0x6E), amberLed).does(b.stutter(g, 1/8)) pad(noteIdAll(0x6F), amberLed).does(b.stutter(g, 1/4)) -
Auto loop
- In auto-loop mode, the pads select loops of sizes 0.5, 1, 2, 4, 8, 16, 32 or 64, beats (starting at the top-left pad). On shift, it creates loops of sizes 1/32, 1/16, 1/8, 1/4, 1/2, 1, 2, or 4 beats.
loopSize = [ "0.03125", "0.0625", "0.125", "0.25", "0.5", "1", "2", "4", "8", "16", "32", "64" ] for (var j = 0; j < 8; ++j) pad(noteId(0x70+j), greenLed).does( g, "beatloop_" + loopSize[4+j] + "_toggle", g, "beatloop_" + loopSize[4+j] + "_enabled") for (var j = 0; j < 8; ++j) pad(noteIdShift(0x70+j), greenLed).does( g, "beatloop_" + loopSize[j] + "_toggle", g, "beatloop_" + loopSize[j] + "_enabled") -
Loop roll
- In loop-roll mode, momentarily creates a loop and, on release returns the playhead to where it would have been without looping. Loop sizes are 1/32, 1/16, 1/8, 1/4, 1/2, 1, 2, or 4 beats (starting at the top-left pad). On shift, it is 0.5, 1, 2, 4, 8, 16, 32 or 64 beats.
loopSize = [ "0.03125", "0.0625", "0.125", "0.25", "0.5", "1", "2", "4", "8", "16", "32", "64" ] for (var j = 0; j < 8; ++j) pad(noteId(0x78+j), greenLed).does( g, "beatlooproll_" + loopSize[j] + "_activate", g, "beatloop_" + loopSize[j] + "_enabled") for (var j = 0; j < 8; ++j) pad(noteIdShift(0x78+j), greenLed).does( g, "beatlooproll_" + loopSize[4+j] + "_activate", g, "beatloop_" + loopSize[4+j] + "_enabled") }, -
Initialization
The
preinitfunction is called before the MIDI controls are initialized. We are going to set the device in basic mode, as mentioned in the manual. This means that mode management is done by the device – this will simplify the script and let have direct lower latency mappings more often.preinit: function () { this.mixxx.midi.sendShortMsg(0xb7, 0x00, 0x6f) this.mixxx.midi.sendShortMsg(0xb7, 0x00, 0x00) }, init: function () { this.decks.activate(0) }, -
Shutdown
The documentation suggests to reset the device when the program shuts down. This means that all the lights are turned off and the device is in basic mode, ready to be used by some other program.
postshutdown: function () { this.mixxx.midi.sendShortMsg(0xb7, 0x00, 0x00) } }); -
Utilities
-
The scaledDiff function returns a behaviour option that is useful to define encoders with a specific sensitivity, which is useful to correct the issues of the stepped encoders.
function scaledDiff (factor) { return function (v, v0) { return (v0 + factor * (v > 64 ? v - 128 : v)).clamp(0, 128) } } function scaledSelectKnob (factor) { return function (v) { return factor * (v > 64 ? v - 128 : v) } } -
Copyright (C) 2013 Juan Pedro Bolívar Puente
This program is free software: you can redistribute it and/or modify it under the terms of the GNU General Public License as published by the Free Software Foundation, either version 3 of the License, or (at your option) any later version.
This program is distributed in the hope that it will be useful, but WITHOUT ANY WARRANTY; without even the implied warranty of MERCHANTABILITY or FITNESS FOR A PARTICULAR PURPOSE. See the GNU General Public License for more details.
You should have received a copy of the GNU General Public License along with this program. If not, see http://www.gnu.org/licenses/.