{assert}  = require '../mixco/util'
script    = require '../mixco/script'
control   = require '../mixco/control'
behaviour = require '../mixco/behaviour'
value = require '../mixco/value'-
script.nanokontrol2
-
Mixxx script file for the Korg NanoKontrol2 controller. The script is based on the Mixco framework.
This script description is a bit more verbose than others, at it tries to serve as tutorial on how to write your own controller scripts. People just interested in the functionallity of the mapping can find this in indented bullet points.
Dependencies
-
First, we have to import he Mixco modules that we are going to use, using the NodeJS, require function.
-
Also, lets define these couple of shortcuts to save typing.
c = control
b = behaviour
v = value
-
The script
-
Declaration
We define the script with the script.register function, which will create the script instance. As first parameter we pass the current module, that is contained in the special NodeJS variable
module. The second parameter is an object with the actual script. Thenameattribute is compulsory and must match file name without extension. It should be a valid JavaScript identifier — i.e. start with a letter and contain only alfanumerical characters or underscore.script.register module, name: 'korg_nanokontrol2' -
Metadata
Then we fill out the metadata. This will be shown to the user in the preferences window in Mixxx when he selects the script.
info: name: '[mixco] Korg Nanokontrol 2' author: 'Juan Pedro Bolivar Puente <raskolnikov@gnu.org>' description: """ Controller mapping for Korg Nanokontrol 2 that is targetted at being used as main interface for Mixxx. """ forums: '' wiki: '' -
Constructor
All the actual interesting stuff happens in the constructor of the script. Here we will create the controls and add them to the script and define their behaviour.
constructor: -> -
Master section
In this section we describe controls that have effect on the master channel and main outputs.
Transport section
All the buttons on the left side of the controllers is what we call the transport section. These are global buttons
- The cycle button will be used as modifier.
@cycle = b.modifier() c.ledButton(0x2e).does @cycle -
Most of the transport controls will have their behaviour defined per-deck. We define them here and add the behaviours later.
@backButton = c.ledButton 0x3a @fwdButton = c.ledButton 0x3b @nudgeDownButton = c.ledButton 0x2b @nudgeUpButton = c.ledButton 0x2c -
- The marker section can be used to browse the library. The left and right arrows browse the playlist up and down. When set is pressed, they move the sidebar.
@marker = b.modifier() c.ledButton(0x3C).does @marker g = "[Playlist]" c.ledButton(0x3D) .when(@marker, g, "SelectPrevPlaylist") .else g, "SelectPrevTrack" c.ledButton(0x3E) .when(@marker, g, "SelectNextPlaylist") .else g, "SelectNextTrack" @loadTrack = c.ledButton(0x2a) -
Here are some more controls that get their actual functionallity defined later.
@sync = c.ledButton(0x29) @syncTempo = c.ledButton(0x2d) -
Channel sections
And finally, some of the master functionality are mapped to the channel sliders.
- The prehear volume is mapped to the 7th slider.
g = "[Master]" c.slider(0x06).does g, "headVolume" -
- The prehear mix is mapped to the 6th slider.
c.slider(0x05).does g, "headMix" -
- The crossfader is mapped to the 2nd slider.
c.slider(0x02).does b.soft g, "crossfader" -
- The main balance is mapped to the 1st slider.
c.slider(0x01).does b.soft g, "balance" -
Deck controls
Then, we create a chooser object over the pfl (prehear) parameter, so we will have only one channel with prehear activated at a time. Also, this will let us change the behaviour of some transport controls depending on which deck is selected — i.e, has prehear enabled.
@decks = b.chooser() -
Finally we add the per-deck controls, that are defined in
addDeck.@addDeck 0 @addDeck 1 addDeck: (i) -> assert i in [0, 1] g = "[Channel#{i+1}]" offset = if i == 0 then [3, 2, 1, 0] else [4, 5, 6, 7] -
Channel sections
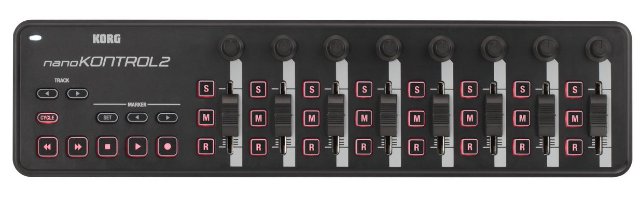
- The top 8 knobs are mapped to the two decks mixer filter section (low, mid, high, gain). They spread out from the center, i.e. the 4th and 5th knob control the low EQ filter, the 3rd and 6th knob control the mid EQ filter, and so on.
c.knob(0x10 + offset[0]).does g, "filterLow" c.knob(0x10 + offset[1]).does g, "filterMid" c.knob(0x10 + offset[2]).does g, "filterHigh" c.knob(0x10 + offset[3]).does b.soft g, "pregain" -
Then two central channel sections (4th and 5th) control the following parameters of the left and right deck:
- S: Selects the deck for prehear.
- M: Cue button for the deck.
- R: Play button for the deck.
- The fader controls the volume of the deck.
c.ledButton(0x20 + offset[0]).does @decks.add g, "pfl" c.ledButton(0x30 + offset[0]).does g, "cue_default" c.ledButton(0x40 + offset[0]).does g, "play" c.slider(0x00 + offset[0]).does g, "volume" -
The two furthest channel sections (1st and 8th) control the pitch related stuff and effects of the two decks.
- S: Bpm tap, also shows the speed.
- M: Toggles key lock.
- R: Sets the beat grid to match the current playhead position.
- The fader controls the pitch of the deck.
c.ledButton(0x20 + offset[3]).does g, "bpm_tap", g, "beat_active" c.ledButton(0x30 + offset[3]).does g, "keylock" c.ledButton(0x40 + offset[3]).does g, "beats_translate_curpos" c.slider(0x00 + offset[3]).does b.soft g, "rate" -
Then, we have some looping related buttons in the middle. Also, these are the hotcue trigger and clear with the cycle and marker modifiers.
- The S, M, R buttons of the central channels (2nd, 3rd, 6th, 7th)
have different functionality, depending on the modifiers.
- Normally, they toggle loops of size 1, 2, 4 and 8 beats. The R buttons of these sections control loop double and halve.
- When the cycle button is held, they launch hot-cues.
- When the set button is held, they clear hot-cues.
c.ledButton(0x20 + offset[1]) .when(@cycle, g, "hotcue_1_activate", g, "hotcue_1_enabled") .else.when(@marker, g, "hotcue_1_clear", g, "hotcue_1_enabled") .else g, "beatloop_2_toggle", g, "beatloop_2_enabled" c.ledButton(0x20 + offset[2]) .when(@cycle, g, "hotcue_2_activate", g, "hotcue_2_enabled") .else.when(@marker, g, "hotcue_2_clear", g, "hotcue_2_enabled") .else g, "beatloop_4_toggle", g, "beatloop_4_enabled" c.ledButton(0x30 + offset[1]) .when(@cycle, g, "hotcue_3_activate", g, "hotcue_3_enabled") .else.when(@marker, g, "hotcue_3_clear", g, "hotcue_3_enabled") .else g, "beatloop_8_toggle", g, "beatloop_8_enabled" c.ledButton(0x30 + offset[2]) .when(@cycle, g, "hotcue_4_activate", g, "hotcue_4_enabled") .else.when(@marker, g, "hotcue_4_clear", g, "hotcue_4_enabled") .else g, "beatloop_16_toggle", g, "beatloop_16_enabled" c.ledButton(0x40 + offset[1]) .when(@cycle, g, "hotcue_5_activate", g, "hotcue_5_enabled") .else.when(@marker, g, "hotcue_5_clear", g, "hotcue_5_enabled") .else g, "loop_halve" c.ledButton(0x40 + offset[2]) .when(@cycle, g, "hotcue_6_activate", g, "hotcue_6_enabled") .else.when(@marker, g, "hotcue_6_clear", g, "hotcue_6_enabled") .else g, "loop_double" - The S, M, R buttons of the central channels (2nd, 3rd, 6th, 7th)
have different functionality, depending on the modifiers.
-
Transport section
These per-deck controls of the transport section have effect on the selected track. We consider the current track for prehear to be the selected track.
The << and >> buttons are a bit more complicated. We want them to behave as nudge buttons for the selected track, but we want the cycle modifier to change the nudge speed.
See how we use the
behaviour.andcondition combinator to mix the conditions. We also usecontrol.else.whento simplify the negative condition.- The << and >> buttons nudge and scroll over the selected track.
chooseCycle = v.and @cycle, @decks.activator i @nudgeUpButton .when(chooseCycle, b.toggle 0, 0.5, g, "wheel") .else.when @decks.activator(i), b.toggle 0, 0.1, g, "wheel" @nudgeDownButton .when(chooseCycle, b.toggle 0, -0.5, g, "wheel") .else.when @decks.activator(i), b.toggle 0, -0.1, g, "wheel" -
- The track< and track> buttons control the selected track fast forward and fast rewind.
@fwdButton.when @decks.activator(i), g, "fwd" @backButton.when @decks.activator(i), g, "back" -
- Load stop button loads the selected track in the selected deck.
@loadTrack.when @decks.activator(i), g, "LoadSelectedTrack" -
- The play and record buttons synchronize to the other track. The later only synchronizes tempo, the former both tempo and phase.
@sync.when @decks.activator(i), g, "beatsync" @syncTempo.when @decks.activator(i), g, "beatsync_tempo" -
Initialization
The init method is called by Mixxx when the script is loaded. Here we can initialize the state of Mixxx. In our case, we select the first deck, such that all transport buttons are directly functional.
init: -> @decks.activate 0 -
License
-
Copyright (C) 2013 Juan Pedro Bolívar Puente
This program is free software: you can redistribute it and/or modify it under the terms of the GNU General Public License as published by the Free Software Foundation, either version 3 of the License, or (at your option) any later version.
This program is distributed in the hope that it will be useful, but WITHOUT ANY WARRANTY; without even the implied warranty of MERCHANTABILITY or FITNESS FOR A PARTICULAR PURPOSE. See the GNU General Public License for more details.
You should have received a copy of the GNU General Public License along with this program. If not, see http://www.gnu.org/licenses/.